

I managed a hobby shop for several years in the 1980s, and built a lot of airplanes on the countertop to demonstrate tools, products, and techniques. One of these models was the Stinger 120, which had been gifted to me by the late Bubba Spivey, president of Lanier R/C.
I got most of the airplane constructed back then, but moves between Virginia, Florida, New Jersey, and Pennsylvania prevented completion of the model. I’ve been in my present location for 17 years, and figured that getting the Stinger and roughly 20 more abandoned projects out of the garages and into my workshop would be an action long overdue.

The Stinger was close to done. The fuselage and tail group were built, and the foam-core wing panels were constructed and joined. After fiberglassing the center section and removing the foam between the cap strips in the wing bays, the airplane was ready for sanding and finishing, but “finishing” a model of this size represents a lot more work than slapping on some plastic film and bolting down an engine. Here’s the deal.
My first step was to drill the control surfaces and flying surfaces for #308 Steel Pin Hinge Points from Robart Manufacturing (robart.com) in St. Charles, Illinois, then temporarily mount the control surfaces, and install the radio system. Incidentally, if you like using Robart Hinge Points, you’ll appreciate the convenience of the company’s #319 Hinge Point Drill Jig.
I chose my JR 12X transmitter with a Spektrum receiver, five JR SPORT ST126MG standard, metal-gear servos for the control surfaces, and one JR SPORT ST47BB standard, ball-bearing servo for the throttle. I wanted a rigid and reliable pushrod system, so I chose Dave Brown Fiberglass Arrow Shafts with Du-Bro Products’ 12” 4-40 Threaded Rods (#144) for all of the control surfaces. A Du-Bro #173 30” Threaded Rod with a Z-bend at the carburetor end and a Du-Bro #109 2-56 Spring Steel Kwik-Link at the servo end make the connection from the throttle servo to the engine’s carburetor arm.

Attachment points for the rudder and two elevator panels are Du-Bro #493 Adjustable Control Horns, with a #866 Heavy Duty Control Horn System on each of the two ailerons. Adjustable clevises are included with the #866 systems, and I chose three Du-Bro #304 4-40 Spring Steel Kwik-Link Clevises for the rudder and elevators.


I initially used the white plastic arms that came with the JR SPORT servos, but later found (following the Stinger’s first flight) that one of these arms had cracked around the output shaft, causing the same effect as a stripped servo gear. Clearly, something stronger was absolutely necessary, and the JR arms were immediately replaced with five Du-Bro #671 Super Strength Servo Arms for JR Servos. Problem solved.

My initial engine choice was a powerful and reliable Enya R-1204C four-stroke, which flew the airplane “nicely,” although it did so with somewhat less authority than I wanted. After two or three flights, I moved the Enya over to a Dynaflite Giant Spitfire (also from my incomplete projects stable), and replaced it with a Saito FA-180GK from Horizon Hobby (horizonhobby.com) in Champaign, Illinois.
Du-Bro rods and arms can do more for you than just control hookups. I wanted to reinforce the tail section as the Stinger plans suggested, so I cut eight #144 4-40 Threaded Rods to the correct lengths, threaded a #304 4-40 Spring Steel Kwik-Link Clevis onto each of them, and silver-soldered a #305 4-40 Solder Kwik-Link to the cut-off end. Every clevis has two arms; one with a pin and the other with a hole to accept the pin. I used a Du-Bro 1-1/4” Cut Off Wheel in my rotary tool to remove the pin arm of each clevis, leaving the arm with the hole to accept a mounting screw. These arms were bent to the correct angles, then attached to the vertical fin, horizontal stabilizer and fuselage points with stainless steel 2-56 machine screws, washers and hex nuts.
The 1-1/2” Tail Wheel is a Du-Bro #150TW, and a pair of Du-Bro #350T 3-1/2” Treaded Wheels are under the wheel pants on my Stinger’s polished aluminum main gear. The main gear retains the wheels with 3/16” machine screws, and I used a Du-Bro #138 3/32” Nickel-Plated Dura-Collar to capture the tail wheel.

A 16-Ounce Fuel Tank (Du-Bro #416) was mounted on a platform behind the firewall, and connected to the Du-Bro #334 Kwik-Fill Fueling Valve and engine nipples with Du-Bro 3/32” Silicone Fuel Line. I also added a #M021 Head Lock Remote (glow plug connector) from Sullivan Products in Baltimore, Maryland (sullivanproducts.com) to simplify glow starter connection. The business end of the engine was completed with a Zinger 14-6 Propeller, and capped with a beautiful 4” Spinner from Tru-Turn Precision Model Products (truturn.com) by ROMCO Manufacturing in Deer Park, Texas.

With all of these accessories temporarily mounted and properly adjusted, I fitted the ABS turtle deck, wing, and tank compartment covers, and cut the ABS cowl for the Enya R120. I glassed the inside of each of these ABS components with 2-ounce cloth and BSI Finish-Cure epoxy resin (bsi-inc.com). Fortunately, I had purchased a “just-in-case” cowl and a pair of fiberglass wheel pants from Fiberglass Specialties (fiberglassspecialtiesinc) at the Toledo RC Expo some years ago, and later cut that cowl to accommodate the more aggressive Saito 180.
Finishing time at hand, I removed the engine, RC gear, and all of the mechanical accessories, and gave the bare airframe components a thorough sanding, beginning with #80-grit paper on a Great Planes Easy-Touch Bar Sander, followed by #100, 150, 220, 320, and 400. I sanded the ABS and fiberglass components with #220, 320, and 400. After vacuuming and tack-ragging, the ABS and fiberglass parts received two coats of Top Flite LustreKote White Primer, followed by two mist coats, one wet coat of LustreKote Jet White paint, and two coats of LustreKote Crystal Clear.
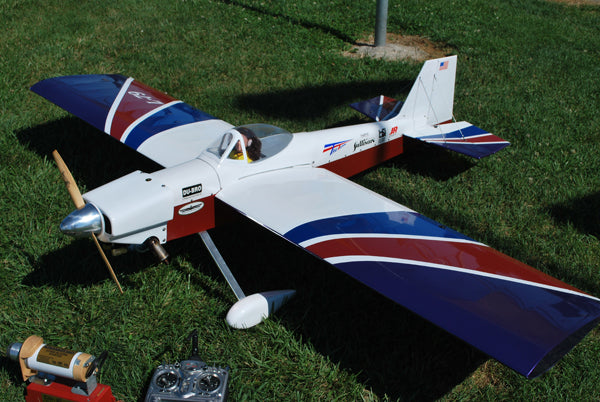
I covered the wooden airframe components with one my favorite iron-on film coverings: the little-publicized ToughLon film from AirBorne Models in Livermore, California (airborne-models.com). I chose #STL100 White, #STL311 Ferrari Red, and #STL 314 Fuchsia to give the model an eye-popping color scheme that would yield a solid visual connection in the air. A 1/4-Scale Female Pilot with “Realistic” Hair, Headset and Mic (#102125D yellow) from AirBorne Models was installed, then the canopy was cut to fit and attached with Zap Formula 560 Canopy Glue by Pacer.

Finishing steps complete, I reinstalled the engine and RC gear, and reassembled all of the accessories, and after nearly 35 years and an overnight charge of the RC system, my Stinger 120 finally made its maiden flight.
My field accessories for the Stinger and many other models include a Du-Bro #907 Fillin Station, Du-Bro #666 Kwik-Start Glo Plug Igniter and Charger, or a #Mcd201 McDaniel R/C Products Metered Ni-Starter and Charger from Sonic-Tronics, Inc. (sonictronics.com) in Elkins Park, Pennsylvania. These are complemented by a sturdy Du-Bro #701 Standard 4-Way Socket Wrench that I am certain will never fail in the next 100 years.
Nothing starts a model airplane engine with greater authority than a #S603 Dynatron or #S651 Magnatron Starter from Sullivan Products, especially when they’re complemented by a Sullivan #S642 Battery Box and a good-quality 5S or 6S LiPo battery. My glow fuel of choice for casual flying is Byron #3130138 AeroGen2 Premium 18: 15% nitro with an 18% blend of castor and synthetic oils.
![]()
I’ve been flying My Lanier Stinger 120 for a few months now, and other than the Du-Bro Heavy Duty Servo Arms, the only changes made after its initial few flights were the engine upgrade to the Saito FA-180GK, and a Zinger 16-10 propeller. The Stinger is truly fun to fly, and has become my go-to airplane for everyday nitro burning.
![]()
Author: Jeff Troy


